In humid climates, wall finishes rarely fail overnight—they. They fail after repetition: rain, heat, damp air, and slow drying. A surface can look fine at handover, then show dark patches after storms, a musty smell, hollow-sounding areas, lifted edges, or seams that start letting water through. These problems usually appear in the same places, for the same reasons: water sits at the bottom of walls, collects at corners, and finds its way in at cuts, joints, and terminations.
This article lays out a straightforward way to prevent those failures. It starts with a simple diagnosis—where the moisture is actually coming from—then moves through substrate readiness, primer and adhesive selection, full-coverage installation, and the small details that decide whether a wall stays clean through the first rainy season. It also explains when breathable protection helps and when it backfires by trapping moisture.
Humid climate failures that cost the most.
In humid and coastal markets the same problems repeat across projects bubbling and hollow spots edge lifting seam leakage mold staining white haze and uneven dark patches after rain These failures usually show up first at the lowest parts of the wall near window corners and around cut edges because water sits there the longest For B2B buyers the cost is rarely the veneer itself it is labor return visits scaffolding time delayed handover and the argument about who pays A good waterproof result is measured by long term stability no smell no mold no rework and no surprise discoloration after the first rainy season
Identify the moisture route before choosing materials
Before changing adhesives or adding a sealer it helps to answer one question where is the moisture coming from Rain intrusion often shows as concentrated damage near openings parapets and horizontal edges Vapor drive and interior humidity show up behind bathrooms kitchens laundry rooms and air conditioned spaces Wet substrate shows up when a new wall is covered too early and the moisture has nowhere to go Condensation shows up where cold surfaces meet humid air and the wall feels damp even without rain
A practical on site method is to map the damage and timing If it worsens right after rain look outside detailing If it worsens at night with air conditioning look for condensation and vapor If it appears soon after installation suspect substrate moisture and curing time Once the moisture route is clear the solution becomes straightforward and the system choices stop being guesswork
Substrate preparation and primer decide whether it will last
In humid climates the wall is the foundation and most failures start here The substrate needs to be strong clean and stable not dusty not chalky and not covered by loose paint Any mold must be removed and treated properly because sealing over it only hides it for a while Cracks and weak plaster should be repaired and leveled so adhesive thickness stays consistent and the veneer sits flat
Primers and bonding agents matter because they reduce dust improve surface cohesion and help the adhesive wet the wall evenly This is the same logic used in mainstream tile and cladding practice performance depends on the substrate preparation and the full setting system not just the facing material A clean well prepared wall is the cheapest waterproofing you can buy because it prevents debonding before it starts
Adhesive choice and full coverage installation prevent debonding
Humid climate projects need an adhesive that matches the exposure level interior dry zone is different from bathroom walls and very different from exterior facades The adhesive should resist moisture and alkalinity and keep bond strength through repeated wet dry cycles A common jobsite shortcut is spot bonding which creates hidden cavities Those cavities collect moisture and become the starting point for bubbling mold smell and hollow sound
A better approach is full spread with a notched trowel controlled thickness and consistent coverage especially near edges corners and cut lines Keep within the adhesive open time press the veneer firmly to remove voids and protect the work during curing If you sell through distribution it is worth stating the adhesive requirement clearly in quotations and installation notes because many warranty claims come from using a low grade indoor adhesive in wet areas
Seams and terminations are the real waterproof weak points

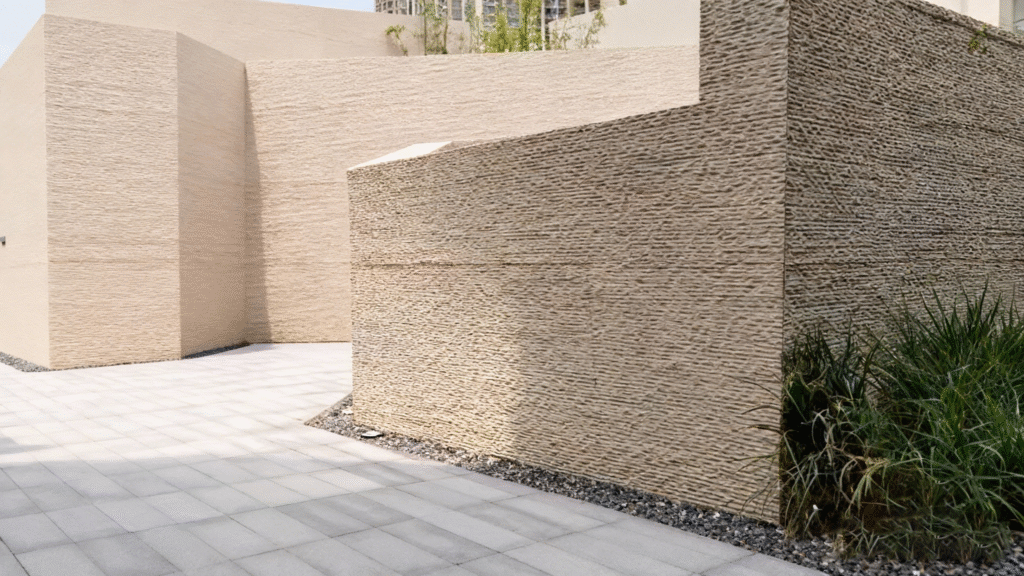
Water rarely penetrates through the middle of a properly installed sheet It enters at seams corners window and door perimeters top edges and bottom edges near splash zones These are the details that separate a clean project from a callback project Decide early whether the design needs movement joints and where sealing is required Use sealants suitable for the exposure and apply them with proper joint preparation clean dry surfaces correct bead size and tooling so the sealant bonds to both sides
Exterior work needs special attention to termination and water shedding If the top edge is open water can run behind the veneer If the bottom edge wicks water it will stain and soften the bond Line up details like drip control and edge protection, so water is directed away instead of being invited into the system
Breathable protection jobsite control and who fits duolongtrade
In long rainy seasons coastal air and constantly damp zones a breathable water repellent sealer can reduce liquid water absorption while still allowing vapor to escape That balance is important in humid climates because trapping moisture behind a tight coating can cause blistering staining or recurring mold Sealer is not a shortcut for bad prep but it can be a strong final layer when the substrate adhesive and detailing are already correct
Jobsite control matters as much as product choice Avoid installation during rain protect fresh work during curing and keep wet rooms ventilated so the wall can dry normally Simple documentation also helps reduce disputes take photos of substrate condition adhesive batch and key detailing points before closing the job
Choosing Duolongtrade means you are optimizing for both “easy to sell” and “fewer after-sales issues.” As a long-term manufacturing partner, Duolongtrade focuses on batch-to-batch stability, controllable delivery, and repeatable on-site results—making it a strong fit for channel customers who need continuous supply, as well as project teams that value certainty in execution and handover.
In humid markets, the expensive part of failure is everything that follows: rework crews, scaffolding, schedule slips, delayed handover, complaints, and the inevitable back-and-forth about responsibility. The reliable way to reduce that risk is to treat moisture control as a system you can repeat—not a quick fix like switching adhesives or adding a sealer after problems appear.
Start by identifying the moisture route before you specify products. Rain intrusion tends to concentrate around openings and terminations; vapor drive shows up behind wet rooms and strong air-conditioning zones; overly wet new substrates fail broadly when covered too early; condensation appears where humid air meets cold surfaces. Once the route is clear, the choices become simple: a sound, clean substrate; primer to stabilize the surface; an adhesive grade that matches exposure; and full-spread installation to avoid hidden voids. Put most of the detailing effort into seams, corners, and edges, and design water-shedding terminations instead of relying on patch sealant. Use breathable protection only when the base system is already correct.
From a buyer’s view, the best supplier is the one that keeps results consistent: stable batches, predictable delivery, clear system guidance, and documentation that reduces claims.